
Most organizations have internal application servers and appliances that send emails to users or groups.
Examples include copier/scanners and application servers, such as backup servers that notify admins of a completed or failed backup job.
If the organization has Exchange on-prem you would normally configure an internal relay receive connector in Exchange and configure the internal resources to send emails to Exchange. But what do you do when you’ve migrated all your mailboxes to Office 365 and have decommissioned your Exchange servers?
The solution is to install an IIS SMTP relay server in your internal network, configure it to accept email from specific IP addresses, and forward emails to Office 365.
You can also configure the SMTP relay for external domains, if necessary.
Here’s how to do it:
- Install the SMTP Server feature and its dependencies to a new or existing Windows server.
- This will be your relay server and your firewall needs to allow it to send SMTP traffic (TCP port 25) outbound to the Internet. I typically use the DirSync server, if there is one.
 |
| Adding the SMTP Server feature and its dependencies to Windows Server 2012 |
- Open Internet Information Services (IIS) 6.0 Manager to configure the SMTP relay.
- Configure the properties of [SMTP Virtual Server #1] as follows:
- On the Access tab:
- Authentication: Only Anonymous access is checked.
- Relay: Only the list below. Add IP addresses or ranges of servers allowed to relay.
- Note – It’s important to only allow IP addresses you trust to relay through this server. Any IP address you enter here will be allowed to send emails on behalf of your domain.
- On the Messages tab:
- Adjust message size limits. The default message size limit is 2048 KB (2 MB). You may want to change it to10240 KB (10 MB) or more to allow for larger messages from copier/scanners, etc.
- On the Delivery Tab:
- Outbound Security: Anonymous access only and no TLS encryption.
- Outbound Connections: Port 25
- Advanced: Leave the Smart Host field blank
- On the Access tab:
- Add new remote domains:
- Right-click Domains > New > Domain and add the domain(s) hosted in Exchange Online.
- If the relay server is allowed to relay emails to other external domains add a new *.com remote domain. Repeat for *.org, *.net, etc. as necessary.
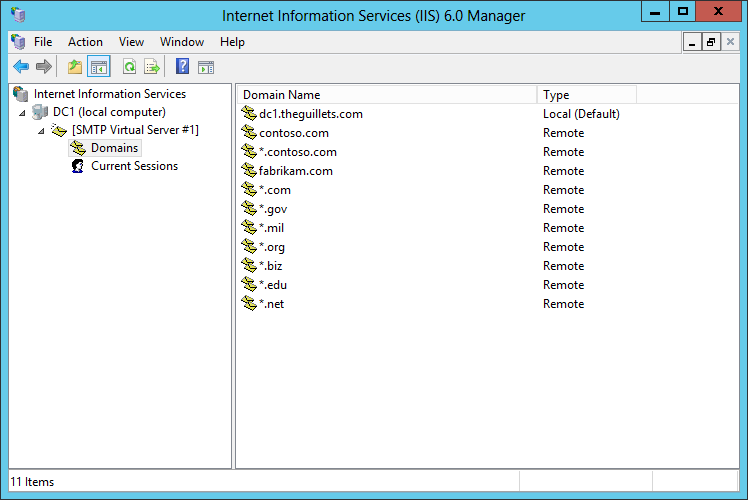 |
| Add Office 365 and other remote domains if required for external relay |
- For properties of each domain hosted in Exchange Online:
- Check Allow incoming mail to be relayed to this domain
- Forward all mail to this smart host: smtp.office365.com
- Outbound Security: Check Anonymous access and TLS encryption
- For properties of all other remote domains (if any):
- Check Allow incoming mail to be relayed to this domain
- Outbound Security: Check Anonymous access and do not check TLS encryption.
- Restart IIS. Be aware that whenever you restart IIS, the SMTP virtual server usually stays stopped – start it.
Notes/Troubleshooting:
- The SMTP Server feature can be added to any Windows 2003 or better server. I usually use the DirSync server if there is one.
- Unlike Exchange, TLS for IIS 6 SMTP servers is not opportunistic. If the virtual server or a remote domain is configured to use TLS email will not be sent if the remote domain does not support TLS. Office 365 offers TLS, so we can use it.
- The configuration above allows the IIS 6 SMTP server to send emails to the Internet for the remote domains configured, so you should add the public NAT IP address for this server to your existing SPF record to prevent non-delivery. Usehttp://whatismyip.com from the SMTP server to determine the NAT IP address.
- Monitor the %systemdrive%\Inetpub\mailroot\Queue folder to ensure that emails are being delivered.
- If emails are not being delivered to Office 365 users, test sending email via Telnet. The IP address may be blocked by an Exchange Online Protection (EOP) blocklist and you will see that response from EOP. If so, send a delist request from your Office 365 admin account to delist@messaging.microsoft.com letting them know the IP address that should be delisted. In my experience it takes up to 36 hours for Microsoft to delist it.
- If emails are not being delivered to external domains, ensure that you have a remote domain type (*.com, *.eu, etc.) configured for those email addresses.
- You can enable logging in the properties of the SMTP virtual server for further troubleshooting. Use the NCSA Common Log File Format. IIS does not automatically groom or delete logs like Exchange does, so turn logging off when you’re done troubleshooting.
- The best practice is to create an A record in internal DNS for smtp.yourdomain.com using the SMTP relay server’s IP, and configure all application servers and appliances to use that FQDN for email forwarding. That makes it easier to update in the future.