
Microsoft has introduced an installation option of Windows Server 2016 that provides an operating system designed and optimized for Cloud operations. Microsoft’s Nano Server is intended to support and run born-in-the-cloud applications and containers. In this article, I will explain how to easily and quickly you can deploy Nano Servers in your server environment, using either PowerShell or a GUI.
Nowadays, IT personnel spend a lot of time on repetitive tasks to accomplish various jobs such as:
- Managing hosts,
- Deploying and maintaining servers,
- Creating an account for a new collaborator,
- and so on…
I believe that one of the best ways of avoiding this type of repetitive job is to be able to automate most of your day-to-day tasks. A big advantage of automation is to be able to simultaneously execute administration tasks in order to optimize the use of your time. Another advantage is to be able to quickly and easily reproduce tasks. In a world of work that requires maximum efficiency, datacenter administrators simply don’t have the time to configure and deploy servers individually. So, the more your tasks are automated, the more time that you will save.
As you probably know, Microsoft has released Windows Server 2016 which offer a new installation option called “Nano Server” which has been designed as a server dedicated for Cloud operations. Installing this seems like a potentially repetitive task that could be automated!
What is Nano Server?
Nano Server is a remotely administered server operating system that is optimized for private clouds and datacenters. It is similar to Windows Server in Server Core mode, but significantly smaller, has no local logon capability, and only supports 64-bit applications, tools, and agents. Nano Server is optimized as a lightweight operating system for running “cloud-native”. It means that the goal of Nano Server is to be quickly and easily deployed by every sysadmin.
How to deploy Nano Server?
Significantly, Nano Server is part of the full ISO image of Windows Server 2016. You can’t download Nano Server as a single ISO image.
So after downloading and extracting Windows Server 2016, you will notice a folder called “Nano Server” which contain “NanoServer.Wim”. The WIM image will let you build your own Nano Server.
Nano Server Image Builder
The first way to build and deploy your Nano Server is “Nano Server Image Builder”. Nano Server Image Builder is a graphical interface that is provided to create Nano Server images and bootable USB drives. Let’s start by downloading the installer from the Microsoft website: https://www.microsoft.com/en-us/download/details.aspx?id=54065
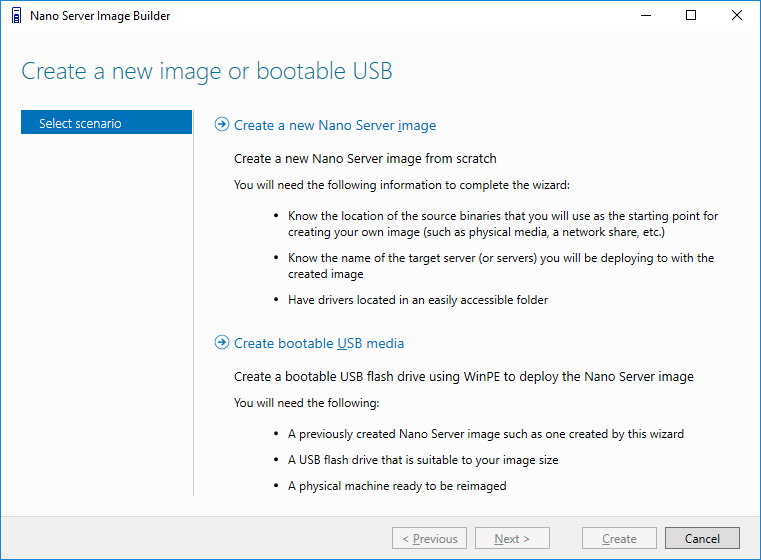
Once the installation is done, you must choose if you want to create a new Nano Server image or a bootable USB media.
Next, you must select the installation media that you need. The Nano Server Image Builder needs the Windows Server 2016 OS files to build a custom image. You must point to a valid location for your media source. It can be the ISO file itself. A valid location must contain a “NanoServer” folder. Next, you must select the type of machine the image will be deploy to. In this case, I will choose a Virtual Machine Image:
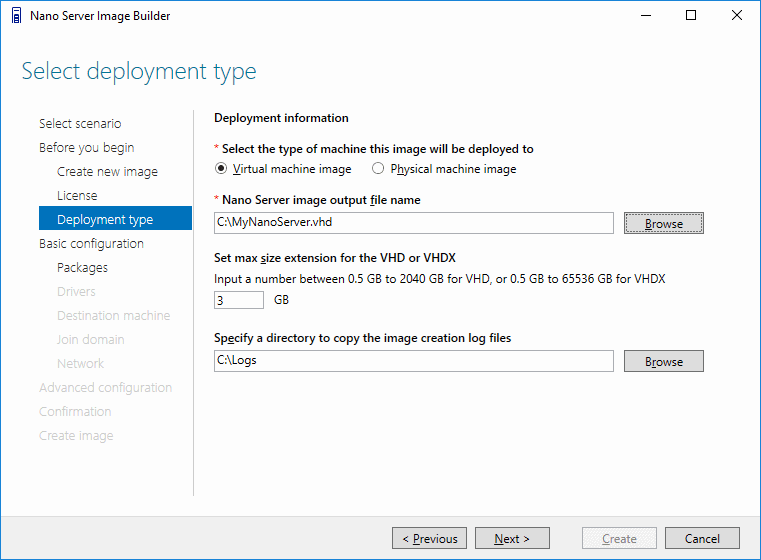
The file extension of the output filename determines whether it creates an MBR-based VHD for Generation 1 virtual machines versus a GPT-based VHDX for Generation 2 virtual machines.
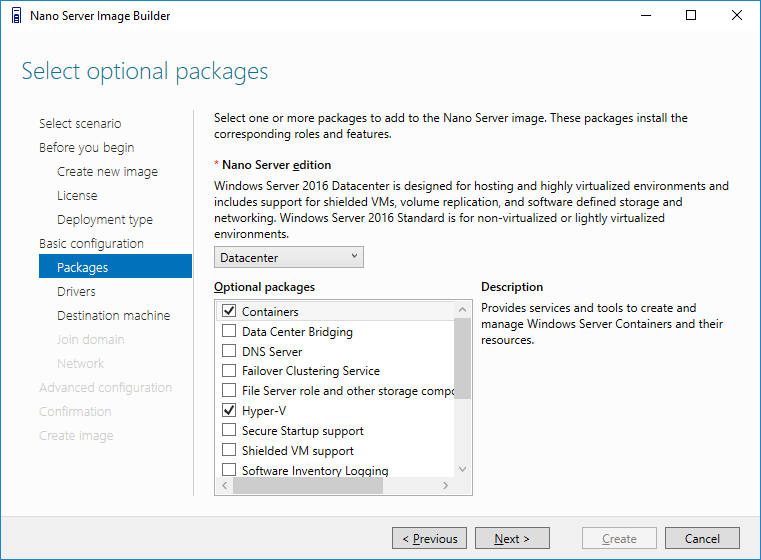
The next part is more interesting because you can customize your Nano Server Image by selecting the Nano Server Edition. Depending the edition, you can add some optional packages such as:
- Containers
- Hyper-V
- DNS Server
- Failover Clustering Service
- Web Server IIS
- Windows PowerShell DSC
- …
If your virtual machine requires specific device drivers, you can include them in this Nano Server Image and the Nano Server will then attempt to load each device driver during boot.
Note that the Virtual Machine integration components for Hyper-V have been selected automatically. Finally, you can configure the computer name, the time zone and the network.
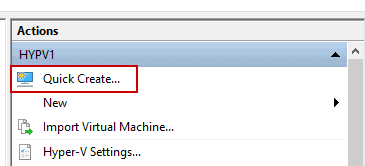
Nano Server Image Builder will create your VHD or VHDX file. You then just have to import this into your Hyper-V manager console. Select “Quick Create” and point to the VHD file previously created:
You can now easily rerun Nano Server Image Builder to create as many new Nano Server Images as you need.
Nano Server Image Generator
The GUI is great for performing a manual deployment task, but you will soon be very likely to need to deploy many Nano Servers. In order to automate the provisioning process, there is a PowerShell module called “Nano Server Image Generator” which lets you create your VHD file using the command-line. Let’s see how to use it.
Firstly, you need to import the module which is located inside the “NanoServerImageGenerator” folder:
|
PS > Import-Module C:\NanoServer\NanoServerImageGenerator\NanoServerImageGenerator.psd1 -verbose
VERBOSE: Loading module from path ‘C:\NanoServer\NanoServerImageGenerator\NanoServerImageGenerator.psd1’.
VERBOSE: Importing function ‘Edit-NanoServerImage’.
VERBOSE: Importing function ‘Get-NanoServerPackage’.
VERBOSE: Importing function ‘New-NanoServerImage’.
|
There are three cmdlets at your disposal.
- New-NanoServerImage: Creates a Nano Server installation image.
- Get-NanoServerImage: Get available packages for a Nano Server installation image.
- Edit-NanoServerImage: Modify a Nano Server installation image.
If you need some additional help, you can use the Get-Help cmdlet followed by one of these cmdlets.
|
PS > Get-Help New-NanoServerImage –full
|
Let’s see how to create a basic Nano Server image. Below is an example:
|
PS > New-NanoServerImage -DeploymentType Guest `
-Edition Datacenter `
-MediaPath “C:\Media\WindowsServer2016\” `
-BasePath .\Base `
-TargetPath “C:\Tmp\MyNanoServer.vhd” `
-MaxSize 10737418240 `
-ComputerName “Nano01” `
-Clustering `
-Package Microsoft-NanoServer-ShieldedVM-Package `
-EnableRemoteManagementPort `
-AdministratorPassword $SecurePassword
|
In the above example, the command will create a Virtual Machine Nano Server image using the -DeploymentType parameter. Two values are possible:
- “Guest” is a Virtual Machine
- “Host” is a Physical Machine
We create a Datacenter edition with the -Edition parameter. It will have the clustering feature added, support for a shielded VM using the -Package parameter, and support for remote management over WinRM will be enabled. Finally, the administrator password will need to be a secure string variable which you can easily convert from a plain-text password.
Note that some of the more popular server features have their own switches such as “clustering” but these can also be added with the -Package parameter.
Now, imagine that you want to update an existing Nano Server Image rather than rebuild a new image. You can use the Edit-NanoServerImage cmdlet to update your Nano Image. The cmdlet operates on an image produced by the New-NanoServerImage cmdlet and you can use the same parameters.
|
PS > Edit-NanoServerImage -TargetPath “C:\Tmp\MyNanoServer.vhd” `
-BasePath .\Base `
-ComputerName “Nano02” `
-AdministratorPassword $NewSecurePassword
|
The first thing that this cmdlet will perform is mounting the VHD file. Then the VHD file will be updated and dismounted once the modifications are done.
If you are wondering how to find all the available parameters? Well, we will use the Show-Commandcmdlet to show you how easy it is to deploy your Nano Server using the New-NanoServerImagecmdlet.
Building a new Nano Server has been made easier with the Show-Command cmdlet from PowerShell 5.0:
|
PS > Show-Command -Name New-NanoServerImage
|
Here is a screenshot of the GUI:
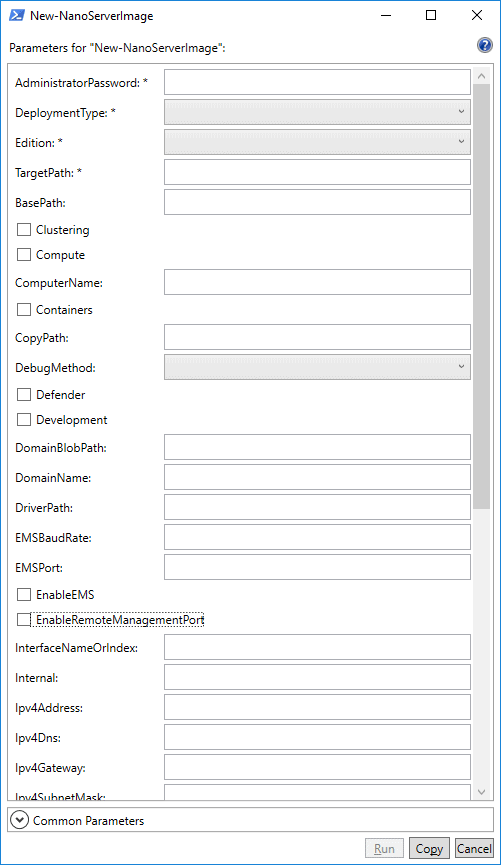
Enter all your values, select which parameters you need, and click “Copy” to get the PowerShell command ready to be used!
Nano Server as a Container base OS Image
Microsoft announced in mid-June the future direction for Nano Server by publishing the announcement of the forthcoming feature update (1709) https://docs.microsoft.com/en-us/windows-server/get-started/nano-in-semi-annual-channel. Microsoft has refocused Windows Server 2016 Core and Desktop as its primary bare metal, while Nano is now focused on containers. It means that Nano Server will be available only as a container-based OS image.
You will must run it as a container in a container host. Running a container based on Nano Server in the new feature release differs from earlier releases in these ways:
- Nano Server has been optimized for .NET Core applications
- Nano Server is even smaller than the Windows Server 2016 version
- Windows PowerShell, .NET Core, and WMI are no longer included by default, but you can include PowerShell and .NET Core container packages when building your container
- There is no longer a servicing stack included in Nano Server. Microsoft publishes an updated Nano container to Docker Hub that you redeploy
- You troubleshoot the new Nano Container by using Docker
- You can now run Nano containers on IoT Core
It means that you must use Nano Server as a Windows Container instead of a Virtual or Physical Machine.
Here is a brief overview. First, you must pull a NanoServer Container image by running the following command:
|
PS > docker pull microsoft/nanoserver
|
You can list all available images using Docker:
|
PS > docker images
|
Now you can create a new Nano Server container from the image using Docker:
|
PS > docker create -t —name MyNanoServer -h NanoServer -i microsoft/nanoserver
|
Now that we have prepared the container, we can start the container and enter into the Nano Servercontainer session interactively:
|
PS > docker start -i MyNanoServer
|
You can now work inside the Nano Server container interactively.