Windows Nano Server is a super lightweight version of Windows Server that was “built for the Cloud”. When I first heard of it I immediately became curious, because it resembles VMware’s ESXi in many ways: It is an embedded-like and headless system with a very small footprint and can be managed only remotely. It has limited use cases, but two of them are acting as a fully-featured Hyper-V virtualization host and as a container host.
You cannot install Nano Server via a bootable setup CD like other editions of Windows Server, but it comes with its own Powershell based deployment framework. It will output a Windows WIM file or a Hyper-V virtual disk file in the old vhd or the newer vhdx format. The image needs to be converted to a VMware vmdk file, and then it needs to be uploaded to an ESXi host and attached to a newly created VM.
The following steps have been tested on a Windows 10 workstation and an ESXi 6.0 U2 host. It should also work with Windows 8.1 and ESXi 5.5 though (maybe with minor modifications).
Building the Image
1. Download the Windows Server 2016 ISO
2. Get the latest VMware vmxnet3 and pvscsi drivers
Download the latest VMware Tools for Windows (x64) in exe format. At the time of this writing this was version 10.0.9. Perform an administrative install of the package by calling it with the /a switch, e.g.:
VMware-tools-10.0.9-3917699-x86_64.exe /a
This will not actually install the Tools on your local system, but extract all files in a directory that you specify in the upcoming GUI:
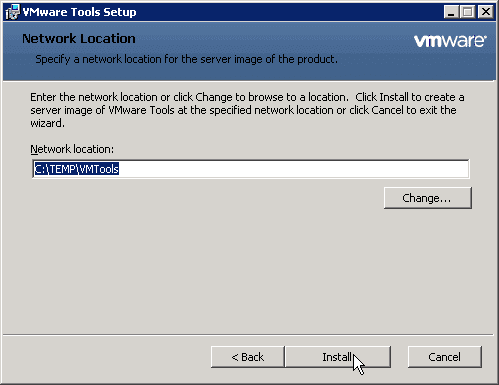
In this example we use the directory C:\TEMP\VMTools. Make sure that C:\TEMP already exists or use another existing parent directory.
Now create a new directory C:\TEMP\Drivers and copy the extracted pvscsi and vmxnet3 drivers to there. In a command prompt run
mkdir C:\TEMP\Drivers
cd “C:\TEMP\VMTools\VMware\VMware Tools\VMware\Drivers”
copy pvscsi\*.* C:\TEMP\Drivers
copy vmxnet3\NDIS6\*.* C:\TEMP\Drivers
To clean up you can delete the C:\TEMP\VMTools directory again now. We do not need it anymore.
3. Run the image build script
Mount the Windows Server 2016 TP5 ISO to make it available as a Windows drive (In Windows 8 and 10 you just need to double-click on it in Explorer to accomplish this). In the following examples I assume that it has been mounted to E:. Adjust this as needed.
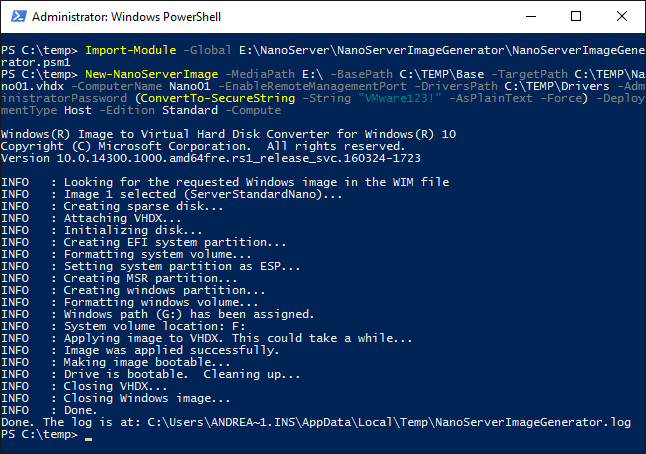
Now open a Powershell window as Administrator and run commands like the following:
1 |
Import-Module -GlobalE:\NanoServer\NanoServerImageGenerator\NanoServerImageGenerator.psm1 |
2 |
New-NanoServerImage -MediaPath E:\ -BasePath C:\TEMP\Base -TargetPathC:\TEMP\Nano01.vhdx -ComputerName Nano01 -EnableRemoteManagementPort-DriversPath C:\TEMP\Drivers -AdministratorPassword (ConvertTo-SecureString -String "VMware123!" -AsPlainText -Force) -DeploymentType Host -Edition Standard -Compute |
The first command imports the NanoServerImageGenerator Powershell module from the TP5 ISO. The second command creates the image. Here is the meaning of the most important switches:
- -MediaPath : Drive letter of the mounted TP5 ISO
- -BasePath : Temporary writable build directory (will be created if not existing)
- -TargetPath : Full file name of the generated image (the format will be determined by the extension: .wim, .vhd or .vhdx)
- -ComputerName : Computername of the Nano Server (you guessed it)
- -EnableRemoteManagementPort : enable the Remote Management Port in Nano Server by default. This can also be done after deployment on the console.
- -DriversPath : Directory with additional drivers to be added. We specify the path to the extracted VMware drivers here
- -AdministratorPassword : the local Administrator’s password as SecureString. We use VMware123! in this example.
- -DeploymentType : Either Host or Guest. Specifying Guest here would automatically add the Hyper-V Integration Tools (the Microsoft equivalent to the VMware Tools), so that you can smoothly run the image as a Hyper-V VM. Since we want to run it under vSphere it is safe to specify Host here (which would also be used for physical deployments).
- -Edition : The Nano Server Edition, either Standard or DataCenter.
- -Compute : This is an optional switch that automatically adds the Hyper-V role to the image. There are other switches for other roles available.
- -DomainName <AD-Domain> : (Not used here) If you have an Active Directory available then you can have the Nano Server automatically join the domain by using this switch. This makes remote management a bit easier, but requires the build command being executed as a Domain admin (resp. with sufficient permissions to join the computer to the domain).
4. Convert the vhdx file to vmdk format
For converting a vhdx file to VMware format there is really only one straightforward way: Use the free Starwind V2V Converter Tool. It requires a registration to download and must be installed, but it is simple enough to use and just does the job. When using it select VMware ESX server image as the Destination image format:
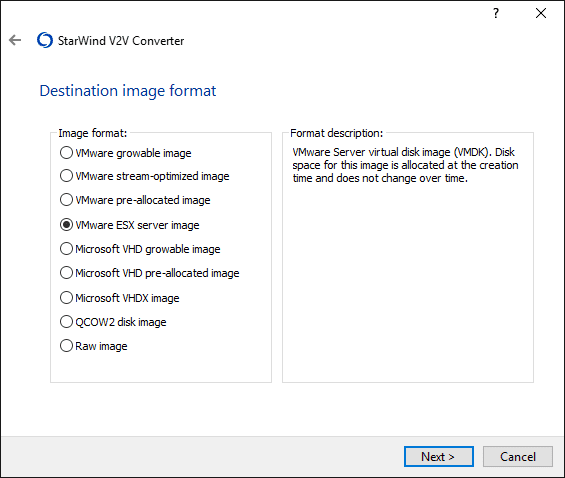
This will create two output files, a small metadata *.vmdk file and the actual disk file *-flat.vmdk (with 4 GB size).
Deploying the VM
Create a new VM on your ESXi host with these options:
- Latest available virtual hardware version (11 on ESXi 6.0)
- Guest OS: Microsoft Windows Server 2016 (64-bit)
- CPU and RAM as needed (I used one CPU socket with two cores and 4 GB RAM)
- A vmxnet 3 Network adapter
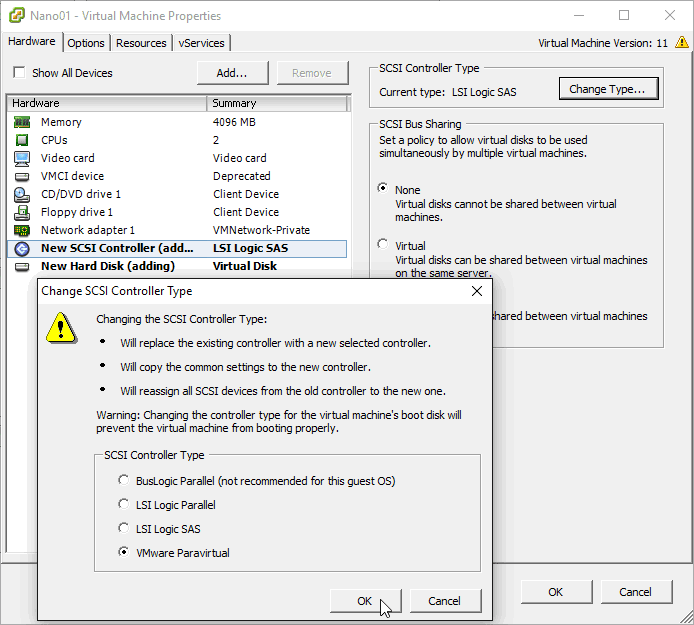
- A VMware Paravirtual (pvscsi) SCSI controller
- Do not add a hard disk at creation time!


Continue from here
This is “only” a guide for deploying Nano Server on vSphere (using the most modern options), but not a guide to using it. There is tons of good documentation already available for this, your starting point is here: http://www.aka.ms/nanoserver.
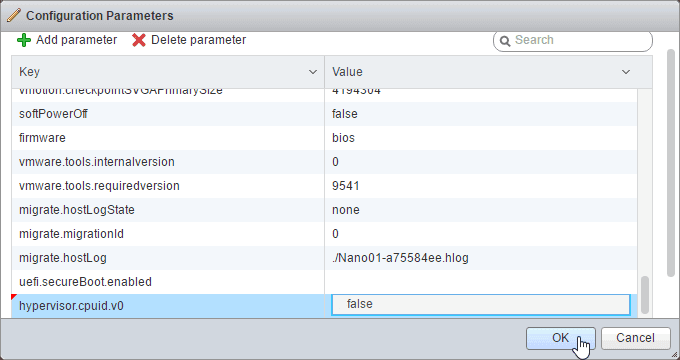
Only one note: If you want to try out using Nano Server as Hyper-V host then you need to enable nested virtualization for the VM by
- enabling hardware assisted virtualization for its virtual CPUs and
- adding the advanced configuration parameter hypervisor.cpuid.v0 with value false
On standalone ESXi hosts this can be done nicely using the new HTML5 Host Client (already included in ESXi 6.0 Update 2 and later):
 |
| Enabling hardware assisted virtualization in the Host Client |
 |
| Adding Advanced Configuration parameter hypervisor.cpuid.v0 in the Host Client |
And I anticipate this question: Can you install VMware Tools on Nano Server? No you cannot, because they are currently provided in MSI package format only, and you cannot install MSI packages on Nano Server! Maybe VMware should work on a Nano Server compatible package? 😉