Allow Exchange relay emails from certain IP addresses
In general, we always try and keep our mail servers as secure as possible, and only allow relaying to trusted/authenticated users. This is in order to avoid our servers being used for spamming and subsequently blacklisted, which can cause delivery issues and headaches if it happens.
However, there are occasional scenarios, where we may need to allow a trusted systems with certain IP address to be able to relay via our Exchange server without authentication:
- Multi-Function print/scan devices
- Network devices that email error/warning/status messages
- Phone systems that provide voicemail-to-email services
Before you go ahead and start making changes to your relay configuration – have a good think about if it’s definitely required, and how you can keep it to a minimal set of IPs. If you end up allowing relay from all IP addresses you’ll quickly find that your server is sending out spam to most of the world!
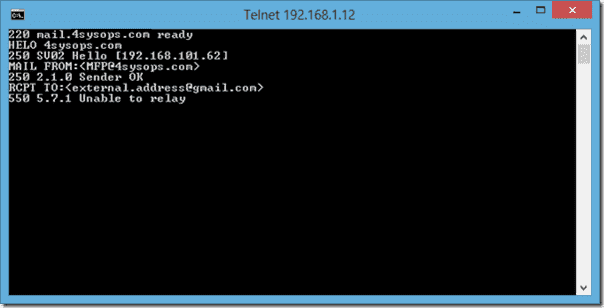
To start with, in the image below, we can see a connection being made from 192.168.101.62 to our Exchange server. Once we specify that we’re sending to an address outside of our Exchange organization, we receive the error 5.7.1 “Unable to relay”. You may also see them same error code with a user unauthenticated message.

Error 5.7.1 Unable to relay
This basically means that mail coming from our IP will not currently be relayed by the Exchange server. To fix this we will create a receive connector that will listen out for traffic coming from our trusted IP and allow anonymous relay. Other traffic should still arrive on the pre-existing receive connectors and remain subject to your original relay rules.
We can create the new receive connector by opening the Exchange Management Console, then navigating to: EMC > Server Configuration > Hub Transport
Select the Hub Transport Server from the top section, then click ‘New receive connector’ from the actions pane on right to start the wizard.
Name your new receive connector something obvious – I choose “Relay: Printers” (It’s then easy and obvious where to add more printer IP’s at a later date if required). For the type select custom, and enter the FQDN of your server, then adjust the IP bindings if required. The new receive connector will listen on all IPs, on port 25 by default.
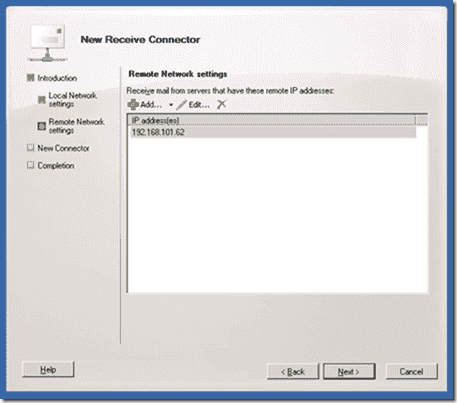
The next screen is very important! By default the wizard will try and create a connector that is listening out for ALL IP addresses, we certainly don’t want to give relay access to all, so remove the default remote network, and then add just the IP address that we want to grant relay access to. So in my case I’m going to add 192.168.101.62.

New Receive Connector
Once you’ve finished the wizard, you should see your new receive connector in the bottom section of the management console. We now need to change a couple of settings to tell it to permit anonymous relay:
Right click the new receive connector, and select properties. From the permissions groups tab, tick “Anonymous” and “Exchange Server”. From the authentication tab, select the “Externally Secured” checkbox, before clicking OK to save your changes.
We should now try another test email to confirm that our changes worked.

2.1.5 Recipient OK
As we can see from the above SMTP conversation, we’re now getting a ‘Recipient OK’ message when we try and relay, so our changes have worked.
Once you’ve finished, it’s probably a good idea to test from some other IP addresses to double check you haven’t accidentally opened up relay access for more than you intended!
